News

  • July 20, 2023 6:11 PM | Anonymous member (Administrator)

    This is the tenth and final installment in the 2020 Seattle Modern Quilt Guild BOM project! Your guides on this journey are Susan Pray (IG: @sushi.farmer) and Kathy McGinnis (IG: @a_swede_life). 

    Make this fun quilt design unique with your own fabric selections. You can start from the beginning at any time! All the instructions posted so far are available on our website here.

    Hanging the moon and finishing your quilt!  

    Hello Cascadia Cabin Peeps,

    This is our last month together; we hope you’ve had some fun, created something new, learned a little about your sewing style, and maybe even expanded your quilting toolbox.

    Let’s be honest, you could have been done last month!  But if you feel there could be just a little more ‘oomphf’ going on, especially in the sky section, here is a template for the crescent moon that was used in the original Cascadia Cabin quilt night sky.

    The crescent was attached to the top using traditional needle turn applique technique.  After rough cutting the fabric approximately ¼” around the template a standard glue stick was used to hold the piece in place while stitching around the outline. 

    Using your fingers, press a crease in the seam allowance all the way around the fabric and pin the seam allowance under. Use thread that matches the top fabric to take tiny stitches around the outline of the fabric seam allowance.  Feel free to trim any excess material to get the points as sharp as you would like them.  Sometimes a stiletto is helpful to tuck and prod everything into place as you secure the fabric.

    For approximate placement of the moon:

    You may wish to use another technique like raw edge applique or double sided iron-on interfacing.  Dealer’s choice!

    For the Halloween version being made this year, the top is getting a witch on a broom, probably a full moon, and likely some ghosts in the forest.  Boo!

    Some suggestions for quilting motifs are free motion swirls in the sky like wind or clouds:

    and then following the outline of the trees to define the forest:

    Should you need it, there are lots and lots of tutorials available online these days to help you figure out how to piece a backing, sandwich, baste, quilt, and bind your new beauty.  The example quilt was faced instead of bound for a different finished look.

    AND that my friends is a wrap.  Thanks for sticking with it, we hope you enjoyed the trip.

    Here’s the full quilt layout again, in case you need to reference it:

    Pinterest Board:  https://www.pinterest.com/quiltguild/medallion-quilt-inspiration/

    Basic Seminole Patchwork by Cheryl Greider Bradkin, 1990

    Liberated Quiltmaking II by Gwen Marston, 2010

    Modern Blocks: 99 Quilt Blocks from Your Favorite Designers, complied by Suzanne Woods, 2011

    Modern Plus Sign Quilts by Cheryl Brickey and Paige Alexander, 2018

    Simply Seminole by Dorothy Hanisko, 1997


  • July 20, 2023 6:10 PM | Anonymous member (Administrator)

    This is the ninth installment in the 2020 Seattle Modern Quilt Guild BOM project! Your guides on this journey are Susan Pray (IG: @sushi.farmer) and Kathy McGinnis (IG: @a_swede_life). 

    Make this fun quilt design unique with your own fabric selections. It’s not too late to start, join us! All the instructions posted so far are available on our website here.

    Creating the Foothills Blocks  

    Hello Cascadia Cabin Peeps,

    This month we will be creating our Foothills blocks in the center of the quilt.  They’re identical in construction as last month’s block except you’ll be using your mountain fabric from last month and reserved forest background fabric.  The same simple, gentle improv technique will be used which will yield unique looking peaks making your foothill range unlike anyone else’s. We call these Foothills because they pair up with the Mountain blocks to form the base of your mountain range. They ensure your mountains don’t end in a straight line at the bottom!

    You can make your fabric strips any width that pleases you as long as your block ends up the correct finished size to fit into the rest of the quilt top.  You could cut 1.5” strips instead of 2.5”, you’d just need 12 of them to create the 12.5” (unfinished) width of the block, or a combination of 1.5” and 2.5” strips.  Dealers choice!  That’s what this “un-pattern” is all about.  Make it your own.

    You will create 5 blocks this month.  Blocks one and two finish at 12” x 5”, the remaining three finish at 12” x 7”.  This month we will sew all the mountain and foothill blocks together and join the sky to the forest.  It’s a BIG MONTH!

    This month’s fabric requirements are approximate: ½  yard of mountain fabric, ½  yard of forest background fabric.  It is suggested that you cut the strips as you need them as everyone will be using a different amount of fabrics based on the length and angle of the cuts you choose to make as you go.  

    Mountain fabric cuts:

    • Qty  (unknown) 2.5” WOF 

    Forest fabric cuts:

    • Qty (unknown) 2.5” WOF

    Exactly as we did last month, begin by laying a mountain strip right side up, then layer a forest fabric strip also right side up overlapping enough to make a diagonal cut through both to create your angle for the foothill range peak.  Don’t try to cut anything to the correct length first.  Cut the angle, then sew, then trim to the correct length.  Refer to the individual diagram of each block to see the direction of the angle and approximate length you’re looking for so you know about what length of strips you’ll need to start with.

    Cut the angle and direction of the cut you’d like to see for the peak through both pieces of fabric.

    This month’s example uses a scrappy collection of mountain fabrics and a single forest background fabric.  Yours will likely be different.

    Make the cuts straight so the seam is easy to sew.  A ruler helps unless you’ve a very steady freehand.

    Offset the angles creating “ears” before sewing right sides together.

    Then sew a ¼” seam at the valley created between the strip and the ear.  This will result in a strip section with nice straight sides.

    After the foothills fabric is sewn to the forest background strip cut it to length (refer to the individual block diagrams) and use the scraps from your first completed strip to continue making peaks until you run out, then cut another set of strips of each fabric and carry on.

    A few of the foothills blocks have been completed and sewn to last month’s mountain blocks:

    When you’re finished with your foothills blocks, join them to the mountain blocks from last month.  Then join the sky section to the top and your forest section to the bottom.  Press and admire your work to date!

    Here’s the full quilt layout again, in case you need to reference it:

    Next month we will be adding the moon, basting to a backing, and deciding on an approach for quilting.

    Pinterest Board:  https://www.pinterest.com/quiltguild/medallion-quilt-inspiration/

    Basic Seminole Patchwork by Cheryl Greider Bradkin, 1990

    Liberated Quiltmaking II by Gwen Marston, 2010

    Modern Blocks: 99 Quilt Blocks from Your Favorite Designers, complied by Suzanne Woods, 2011

    Modern Plus Sign Quilts by Cheryl Brickey and Paige Alexander, 2018

    Simply Seminole by Dorothy Hanisko, 1997

    Please be social!

    Don’t forget to tag your progress pictures on Instagram! Use the hashtags #cascadiacabinquilt or #smqgbom2020 to share your BOM progress.

    Also continue to use the hashtags #seamqg  #seattlemqg  #showusyourmqg and #seattlemqgsewathome to share the wonderful quilts you’re creating.


  • July 20, 2023 6:08 PM | Anonymous member (Administrator)

    This is the eighth installment in the 2020 Seattle Modern Quilt Guild BOM project! Your guides on this journey are Susan Pray (IG: @sushi.farmer) and Kathy McGinnis (IG: @a_swede_life). 

    Make this fun quilt design unique with your own fabric selections. It’s not too late to start, join us! All the instructions posted so far are available on our website here.

    Creating the Mountain Blocks  

    Hello Cascadia Cabin Peeps,

    This month we will be creating our mountain blocks in the upper center of the quilt. They’re fairly straightforward in construction using your reserved sky fabric from earlier this year and your mountain fabric. We will be using a simple and gentle improv technique which yields unique-looking peaks. You might recognize that this month’s block is similar to the more structured, traditional quilt pattern, Delectable Mountains. Here’s a little history of the design in case you are interested.

    Your own personal mountain range will look unlike anyone else’s. What could be better? If you wish, you could make your fabric strips any width that pleases you as long as your block ends up the correct finished size to fit into the rest of the quilt top. You could cut 1.5” strips instead of 2.5”, you’d just need 12 of them to create the 12.5” (unfinished) width of the block, or a combination of 1.5” and 2.5” strips. Dealers choice! That’s what this “pattern” is all about. Make it your own.

    You will create 5 blocks this month. Blocks one and two finish at 12” x 10”, the remaining three finish at 12” x 8”. We will not be sewing the whole mountain range together until we finish our Foothills blocks next month. At that point you can join your finished sky section and your finished forest sections to the reserved mountain/foothills section. Nearly done!

    This month’s fabric requirements are approximate: ½ yard of sky fabric, ½ yard of mountain fabrics. It is suggested that you cut the strips as you need them, since everyone will be using a different amount of fabrics based on the length and angle of the cuts you choose to make as you go. Everyone will need the two larger pieces of sky fabric for blocks one and two.

    Sky fabric cuts:

    • Qty 1 – 12.5” x 6.5”
    • Qty 1 – 12.5” x 4.5”
    • Qty (unknown) – 2.5” WOF

    Mountain fabric cuts:

    • Qty (unknown) 2.5” WOF

    Begin by laying a mountain strip right side up, then layer a sky fabric strip also right side up overlapping enough to make a diagonal cut through both to create your angle for the mountain range peak. Don’t try to cut anything to the correct length first. Your angles can be sharp or gradual, depending on how rugged you want your mountains to look. If you want an improv look, be sure to vary the angles from strip to strip. For each strip cut the angle, then sew, then trim to the correct length. Refer to the individual diagram of each block to see the direction of the angle and approximate length you’re looking for so you know about what length of strips you’ll need to start with.

    Cut the angle and direction of the cut you’d like to see for the peak through both pieces of fabric.

    Make the cuts straight so the seam is easy to sew. A ruler helps unless you’ve a very steady freehand.

    Place your two fabrics RST with the corners offset as shown below; this creates “ears” and marks the ¼” seamline.

    Then sew a ¼” seam at the valley created between the strip and the ear. This will result in a strip section with nice straight sides.

    After the sky is sewn to the mountain strip cut it to length (refer to the individual block diagrams) and use the scraps from your first completed strip to continue making peaks until you run out, then cut another set of strips of each fabric and carry on.

    For instance, in block number 1 all the strip sets will be 4.5” tall but the length of the mountain and sky fabrics will change depending on the strip’s placement in the block.

    Sew your strips together to form a rectangle, then add the top rectangle section of fabric in blocks 1, 2, & 3. Blocks 4 and 5 don’t have top pieces; they’re made up of strip sets only.

    This month’s example uses a single sky fabric and a scrappy collection of mountain fabrics.

    Mountain blocks 1 and 2 completed:

    Here’s the full quilt layout again, in case you need to reference it:

    Next month we will be creating the Foothills range of blocks using mountain and forest fabrics using the exact same technique.

    Pinterest Board:  https://www.pinterest.com/quiltguild/medallion-quilt-inspiration/

    Basic Seminole Patchwork by Cheryl Greider Bradkin, 1990

    Liberated Quiltmaking II by Gwen Marston, 2010

    Modern Blocks: 99 Quilt Blocks from Your Favorite Designers, complied by Suzanne Woods, 2011

    Modern Plus Sign Quilts by Cheryl Brickey and Paige Alexander, 2018

    Simply Seminole by Dorothy Hanisko, 1997

    Please be social!

    Don’t forget to tag your progress pictures on Instagram! Use the hashtags #cascadiacabinquilt or #smqgbom2020 to share your BOM progress.

    Also continue to use the hashtags #seamqg  #seattlemqg  #showusyourmqg and #seattlemqgsewathome to share the wonderful quilts you’re creating.


  • July 20, 2023 6:07 PM | Anonymous member (Administrator)

    This is the seventh installment in the 2020 Seattle Modern Quilt Guild BOM project! Your guides on this journey are Susan Pray (IG: @sushi.farmer) and Kathy McGinnis (IG: @a_swede_life). 

    Make this fun quilt design unique with your own fabric selections. It’s not too late to start, join us! All the instructions posted so far are available on our website here.

    Creating the Cabin Block  

    Hello Cascadia Cabin Peeps,

    David was 100% correct at the last guild meeting, there is a “small and mighty” group of people who have chosen to do this sew along/block of the month this year. There are many reasons for this, a number of folks were avid sewists but have put sewing on hold in their lives, possibly for the meantime or who knows? These are strange days and we all cope differently.  Just so you know it’s been a lot of work for a number of us to provide this pattern and your participation means so much. Thank you!

    We are over halfway to completion of our cabin in the woods quilt! This month is all about creating the cabin block. Sure it’s only one block, but it is possibly the most interesting and challenging block in the whole top. This month let your creativity free and “build” a little get-away cabin/cottage/tiny home of your own to occupy the bottom right corner of your quilt. You are encouraged to improv but if that’s not your jam we have also provided a simple foundation paper pieced (FPP) wonky cabin plus some additional links for inspiration.

    The block size you’re aiming for is (unfinished) 12.5” x 16.5”.  That’s a lot of real estate to fill in some way that floats your boat, or builds your cabin, as the case may be.

    Cabin Block Inspiration  

    Here is a tutorial found online to make little improv houses by Jo Avery of My Bear Paw. Jo’s tutorial has terrific photos and the house ends up a good size 12.5” x 12.5” to fit into the corner block with some changes to the filler strip pieces.

    Here is a link to a FPP house block by Wombat Quilts that finishes to 10” x 10”, exactly the size of the house in the final block and includes some trees. At the time of writing the FPP block was a free download on the Wombat Quilts site.

    OR, feel free to find another house block pattern that finishes smaller than 12” x 16” to fit in the final forest block of this quilt. A Halloween version you’ll see here uses the Haunted House block from Flying Parrot Quilts and is part of her Epic Halloween Quilt SAL. At the time of writing pattern is a free download from Flying Parrots which finishes at 9” x 12”, some changes were to the filler strips sizes to make the house fit the finished block size.

    FPP Wonky Cabin  

    Lastly there is a simple FPP wonky cabin that was designed using EQ8 for this project and is included with this month’s post. There are a large number of tutorials available online to teach you the basics of foundation paper piecing which will be far more successful at teaching you how to FPP than could be communicated here so we won’t even try. 

    We are giving you lots of options to create the tiny house of your dreams.  Hopefully not too many. 

    You may wish to download and print a copy of the entire quilt which has all the dimensions of each piece labeled for reference as you assemble this last block. It is provided again this month for your convenience here (1.9 MB PDF):

    The original one room cabin “built” for the first Cascadia Cabin in the Woods quilt was pure improv.  It was assembled starting with the front door and moving out by adding fabrics then trimming, then adding more fabrics. The goal was a small cozy cabin lit from within:

    This is the Haunted House (cabin) from Flying Parrots Quilts for the halloween version of Susan’s quilt:

    Here is a Simple Wonky Cabin block which you could use if you wish to foundation paper piece this block. It is also easily achievable using improv techniques so don’t feel at all obligated to use this pattern. It is provided only for those who prefer not to improv:

    You may want to print out a coloring sheet to help guide you while sewing the pieces together:

    Instructions for the FPP templates:

    Here are 4 pages of templates for the Simple Wonky Cabin block: DOWNLOAD PDF TEMPLATES (540 KB)

    Please note: this is a rudimentary FPP block, please be kind and recall this is a free pattern.  For all the pieces that are single sections like G, K, & L it works quite well to baste the fabric to the pattern template with your longest machine stitch or use a glue stick.

    1. Cut out, piece and baste fabrics for all templates A through L.
    2. Sew B to C, then join D to the B/C section.  Remember that the angle of the roof and order of pieces will be a mirror image of the coloring sheet in the finished block.
    3. Sew A to B/C/D section, this is the front of the cabin.
    4. Sew E & F to sides of front of cabin.
    5. Sew G to top of cabin.
    6. Sew H & I (roof lines) to the cabin front section.
    7. Sew K and then J to each side of the roof section.
    8. Sew L on bottom of cabin section.  Remove all the foundation papers, block should now be 10.5” x 10.5”
    9. Refer to diagram for measurements and sew side and bottom background pieces onto cabin block to make a 12.5” x 16.5” block.

    When your cabin is done assemble your reserved tree sections with your new block according to the whole quilt diagram and press.  Voila!!  The bottom section of your quilt is done!!

    Next month we will be creating the mountain range in the upper midsection of the quilt using sky fabric and mountain fabric using a very mild form of improv to create more interest in the mountain peaks.

    Pinterest Board:  https://www.pinterest.com/quiltguild/medallion-quilt-inspiration/

    Basic Seminole Patchwork by Cheryl Greider Bradkin, 1990

    Liberated Quiltmaking II by Gwen Marston, 2010

    Modern Blocks: 99 Quilt Blocks from Your Favorite Designers, complied by Suzanne Woods, 2011

    Modern Plus Sign Quilts by Cheryl Brickey and Paige Alexander, 2018

    Simply Seminole by Dorothy Hanisko, 1997

    Please be social!

    Don’t forget to tag your progress pictures on Instagram! Use the hashtags #cascadiacabinquilt or #smqgbom2020 to share your BOM progress.

    Also continue to use the hashtags #seamqg  #seattlemqg  #showusyourmqg and #seattlemqgsewathome to share the wonderful quilts you’re creating.


  • July 20, 2023 5:57 PM | Anonymous member (Administrator)

     ·

    This is the sixth installment in the 2020 Seattle Modern Quilt Guild BOM project! Your guides on this journey are Susan Pray (IG: @sushi.farmer) and Kathy McGinnis (IG: @a_swede_life). 

    Make this fun quilt design unique with your own fabric selections. It’s not too late to start, join us! All the instructions posted so far are available on our website here.

    Piecing tree blocks 5 thru 8  

    This month you’ll get directions for piecing your tree blocks 5 thru 8. After last month’s post you’re all old hands at this so without further ado let’s get this party started. The photos included in these directions are a Halloween version of the Cascadia Cabin Quilt. 

    Fabric Requirements:

    Gather your remaining (12) finished trees from last month plus all your leftover WOF strips cut last month and any large scraps of forest background you have set aside from prior months.

    You may wish to distribute your trees first so that you get a good mix of colors and fabrics across the blocks, especially if you’ve gone scrappy.

    You should have the following trees left over from prior months work:

    • (6) – 4.5” x 6”
    • (2) – 5.5” x 6”
    • (3) – 8.5” x 8.5”
    • (1) – 8.5” x 10”

    For ease of organization you may want to cut the pieces only as needed for each block from the WOF strips and from large scraps left over from last month when assembling the blocks this month. Remember to save your fabrics for the improv cabin block next month and the mountain range in the midsection of the quilt which we will begin in August.

    Cutting directions for SCRAPS: please refer to the block diagrams below and cut your scraps to size as needed as you assemble each block.

    You may wish to download and print a copy of the entire quilt which has all the dimensions of each piece labeled for reference as you assemble these blocks. It is provided again this month for your convenience here.

    Tree Block Five

    Trees needed:

    • (2) 8.5 x 8.5
    • (2) 4.5 x 6.5

    Background fill strips needed:

    • (1) 8.5 x 3 (optional: cut a 8.5” piece from your 6.5” WOF strip then cut it down longways to 3”)
    • (1) 8.5 x 2 (optional: cut this 2” strip from the leftovers of the last cut)
    • (2) 4.5 x 1.5
    • (1) 4.5 x 2.5

    Block Five Diagram:

    Sew the pieces together and press.

    Tree Block Six

    Trees needed:

    • (3) 4.5 x 6.5
    • (1) 5.5 x 6.5

    Background fill strips needed:

    • (1) 5.5 x 6.5
    • (1) 5.5 x 2.5
    • (2) 4.5 x 2.5
    • (1) 6.5 x 2
    • (1) 6.5 x 3

    Block Six Diagram:

    Assemble and press.

    Tree Block Seven

    Trees needed:

    • (1) 5.5 x 6.5
    • (1) 8.5 x 10.5

    Background fill strips needed:

    • (1) 5.5 x 5.5 (cut from scrap)
    • (1) 5.5 x 3.5
    • (1) 8.5 x 4.5 (you may need to cut from scrap)

    Tree Block Seven Diagram:

    Assemble and press:

    Tree Block Eight

    Trees needed:

    • (1) 4.5 x 6.5
    • (1) 8.5 x 8.5

    Background fill strips needed:

    • (1) 12.5 x 2.5 (cut from scrap)
    • (1) 4.5 x 4.5
    • (1) 8.5 x 2.5 (cut from scrap)

    Tree Block Eight Diagram:

    Assemble and press:

    You may wish to set your completed blocks aside OR you may wish to sew blocks 6 and 7 together then join to block 5 and join them to the section completed last month. Block 8 will have to wait until next month when the Cabin block is completed.

    Next month: you will create the Improv Cabin block which will go in the right lower corner. The block can be as straightforward or elaborate as you prefer, you’ll get lots of options. You can also finish sewing the bottom section of the quilt together at that time.

    Pinterest Board:  https://www.pinterest.com/quiltguild/medallion-quilt-inspiration/

    Basic Seminole Patchwork by Cheryl Greider Bradkin, 1990

    Liberated Quiltmaking II by Gwen Marston, 2010

    Modern Blocks: 99 Quilt Blocks from Your Favorite Designers, complied by Suzanne Woods, 2011

    Modern Plus Sign Quilts by Cheryl Brickey and Paige Alexander, 2018

    Simply Seminole by Dorothy Hanisko, 1997

    Please be social!

    Don’t forget to tag your progress pictures on Instagram! Seattle MQG members who post their BOM progress on Instagram using the hashtags #cascadiacabinquilt or #smqgbom2020 by midnight, July 7th will be entered into a drawing for a nice prize, which David will mail to the winner. Not on Instagram? No problem. Simply email us at seattlemodernquiltguild@gmail.com by the same deadline with a photo of your BOM progress. (If your IG account is set to private, use the email option.) The drawing will be held live during our Zoom membership meeting. Need not be present to win, but you do have to submit your progress to be included.

    Also continue to use the hashtags #seamqg  #seattlemqg  #showusyourmqg and #seattlemqgsewathome to share the wonderful quilts you’re creating.


  • July 20, 2023 5:55 PM | Anonymous member (Administrator)

    This is the fifth installment in the 2020 Seattle Modern Quilt Guild BOM project! Your guides on this journey are Susan Pray (IG: @sushi.farmer) and Kathy McGinnis (IG: @a_swede_life). 

    What, you haven’t started yet? It’s not too late to join in and create your own version of this wonderful quilt. All the instructions posted so far are available on our website here.

    Piecing tree blocks 1 thru 4  

    This month you’ll get directions for piecing your tree blocks 1 thru 4. Easy peasey!! Let’s do this thing. 

    Fabric Requirements:

    Forest background: a ½ yard plus a piece at least 7.5″ x 10.5″ or equivalent scraps. See February post for complete listing of yardage requirements. In this tutorial the forest background fabric is all the same fabric; in the original Cascadia Cabin quilt the forest background was all scraps.

    Gather all your (25) finished trees from last month plus any large scraps of forest background you have set aside from prior months.

    You may wish to distribute your trees first so that you get a good mix of colors and fabrics across the blocks, especially if you’ve gone scrappy.

    As a reminder you will have these sizes of trees from the May 1st post:

    • (12) – 4.5” x 6”
    • (4) – 5.5” x 6”
    • (3) – 6.5” x 8”
    • (5) – 8.5” x 8”
    • (1) – 8.5” x 10”

    Cutting directions for SINGLE forest background fabric yardage.

    To begin cut the following WOF size strips:

    • 1.5 x WOF qty 1
    • 2.5 x WOF qty 2
    • 4.5 x WOF qty 1
    • 6.5 x WOF qty 1

    For ease of organization you may want to cut the pieces only as needed for each block from the WOF strips when assembling the blocks this month.  Remember to save all your fabrics for future months.

    Cutting directions for SCRAPS: please refer to the block diagrams below and cut your scraps to size as needed for each block as you go along.

    It may be more convenient for you to download and print a copy of the entire quilt which has all the dimensions of each piece labeled for reference as you assemble these blocks.

    Tree Block One

    Trees needed:

    • (2) 5.5 x 6.5
    • (2) 4.5 x 6.5
    • (1) 6.5 x 8.5

    Background fill strips needed:

    • (1) 3.5 x 8.5
    • (1) 2.5 x 5.5
    • (2) 2.5 x 4.5
    • (2) 1.5 x 5.5

    Block One Diagram:

    Cut your strips and lay them out with your trees like this:

    Sew the pieces together and press.

    Tree Block Two

    One Tree needed:

    • 6.5 x 8.5

    Background fill strips needed:

    • 1.5 x 7.5
    • 2.5 x 7.5
    • 7.5 x 10.5   This is the largest piece you’ll be cutting for the tree blocks, it was cut from a large scrap and not from a WOF strip

    Block Two Diagram:

    Assemble and press.

    Tree Block Three

    Trees needed:

    • (2) 4.5 x 6.5
    • (2) 8.5 x 8.5

    Background fill strips needed:

    • (2) 2.5 x 4.5
    • 4.5 x 4.5
    • 8.5 x 4.5

    Tree Block Three Diagram:

    Assemble and press:

    Tree Block Four

    Trees needed:

    • (2) 4.5 x 6.5
    • (1) 6.5 x 8.5

    Background fill strips needed:

    • (2) 2.5 x 8.5
    • 1.5 x 4.5
    • 4.5 x 2
    • 4.5 x 3
    • 4.4 x 2.5

    Tree Block Four Diagram:

    Assemble and press:

    Assemble blocks 1 thru 4, sew together and press.

    Next month we will assemble blocks 5 thru 8 in much the same manner.

    Pinterest Board:  https://www.pinterest.com/quiltguild/medallion-quilt-inspiration/

    Basic Seminole Patchwork by Cheryl Greider Bradkin, 1990

    Liberated Quiltmaking II by Gwen Marston, 2010

    Modern Blocks: 99 Quilt Blocks from Your Favorite Designers, complied by Suzanne Woods, 2011

    Modern Plus Sign Quilts by Cheryl Brickey and Paige Alexander, 2018

    Simply Seminole by Dorothy Hanisko, 1997

    Please be social!

    Don’t forget to tag your progress pictures on Instagram! Seattle MQG members who post their BOM progress on Instagram using the hashtags #cascadiacabinquilt or #smqgbom2020 by midnight, June 9th will be entered into a drawing for a nice prize, which David will mail to the winner. Not on Instagram? No problem. Simply email us at seattlemodernquiltguild@gmail.com by the same deadline with a photo of your BOM progress. (If your IG account is set to private, use the email option.) The drawing will be held live during our June 10th Zoom membership meeting. Need not be present to win, but you do have to submit your progress to be included.

    Also continue to use the hashtags #seamqg  #seattlemqg  #showusyourmqg and #seattlemqgsewathome to share the wonderful quilts you’re creating.


  • July 20, 2023 5:53 PM | Anonymous member (Administrator)

    ·

    This is the fourth installment in the 2020 Seattle Modern Quilt Guild BOM project! Your guides on this journey are Susan Pray (IG: @sushi.farmer) and Kathy McGinnis (IG: @a_swede_life). 

    What, you haven’t started yet? It’s not too late to join in and create your own version of this wonderful quilt. All the instructions posted so far are available on our website here.

    Your fabric choice will make this project sing!

    How will you put your own design spin on this pattern? The fabrics you choose from your stash will make it your own. Here’s the original design:

    Here’s a monochromatic color scheme, with all shades of blue:

    How about a fall color theme, with a purple sky?

    Or, why not go black, white and grey?

    The design possibilities are limitless as are the options to make some blocks improv style. Here’s the coloring sheet again, which is also included in the February blog post, if you’d like to print out a copy and play with color combinations:

    Let’s make some trees!!!  

    This month’s blocks are improv but for those of you who have some concerns, be not afraid, my friends.  We will walk you through it start to finish and you’ll have an entire forest of twenty-five trees very soon.

    You may have lots of experience making improv triangle trees already.  If that’s the case skip the end for the total number and sizes of trees needed.  Boom!  Wasn’t that easy?  If you want to see some different methods of tree construction please peruse the two links given below.  The first link is the method used in the how-to photos below.

    Amy Smart from Diary of a Quilter has an easy to follow improv tutorial on trees for a Christmas quilt which you can see here. Unfortunately the finished trees are not the right size for our use but you can get the general idea of construction which was used in the photos below.

    Leanne from She Can Quilt has an improv tree tutorial with a different type of construction which can be found here. Leanne’s trees do not have trunks as Amy’s do but those could be added.

    Fabric Requirements:

    Forest background: 1.5 yards or equivalent scraps. Reserve large scraps and additional yardage for sewing the forest blocks together next month.  See February post for complete listing of yardage requirements. In this tutorial the forest background fabric is all the same, in the original quilt the forest background was all scraps.

    Trees: 25 large scraps of various sizes or about a yard.

    Trunk fabric: small scraps.

    Cutting Directions:

    Please note these are the minimum dimensions of fabric needed to make each size of block, you may use larger pieces.  You may wish to cut larger background pieces when you’re first doing trees until you get the hang of how the shape works with improv piecing.

    Background pieces quantity and minimum size:

    • (12) – 6” x 8”
    • (4) – 7” x 8”
    • (3) – 8” x 10”
    • (5) – 10” x 10”
    • (1) – 10” x 12”

    Tree fabric pieces quantity and minimum size:

    • (12) – 4.5” x 6”
    • (4) – 5.5” x 6”
    • (3) – 6.5” x 8”
    • (5) – 8.5” x 8”
    • (1) – 8.5” x 10”

    Trunks:

    • Cut small scraps as needed.

    For a 4.5” x 6.5” tree you’ll need one tree piece at least 4.5” x 6” (on the left) and one background piece (on the right) at least 6” x 8” as shown below.  Also cut a small piece of trunk fabric, about 1.25” x 2”. 

    Lay the tree fabric over the background fabric and make a cut across the bottom of the background fabric for your trunk space. Then cut that bottom background strip in approximately the center to yield two pieces that will go on either side of the trunk.  

    For the tree itself, make two cuts through the tree and background fabric to define your triangular tree shape.  A ruler was used to make straight cuts but these cuts could be freehand. 

    Place a small scrap of trunk fabric (about 1.25” x 2”) in the center of the bottom background piece.

    Discard the extra tree fabric and extra background fabric.

    Sew the triangle of tree fabric into the background fabric, pressing as you go.  Sew the trunk scrap into the center of the background and trim.  Then sew the bottom piece onto the top and trim to 4.5” x 6.5” for the final unfinished size.  

    Here is another more wonky and playful 4.5” x 6.5” tree.

    Then there were three.

    You may wish to cut multiple trees at one time by layering your tree and background fabrics before making the cuts.

    Finalize Your Tree Blocks

    Total number of tree blocks needed by size (includes seam allowance):

    • (12) – 4.5” x 6.5”
    • (4) – 5.5” x 6.5”
    • (3) – 6.5” x 8.5”
    • (5) – 8.5” x 8.5”
    • (1) – 8.5” x 10.5”

    You will have a total of 25 trees in your forest. 

    We will assemble 1 – 4 of the 8 forest blocks in the June 1st SMQG 2020 BOM post next month.

    Pinterest Board:  https://www.pinterest.com/quiltguild/medallion-quilt-inspiration/

    Basic Seminole Patchwork by Cheryl Greider Bradkin, 1990

    Liberated Quiltmaking II by Gwen Marston, 2010

    Modern Blocks: 99 Quilt Blocks from Your Favorite Designers, complied by Suzanne Woods, 2011

    Modern Plus Sign Quilts by Cheryl Brickey and Paige Alexander, 2018

    Simply Seminole by Dorothy Hanisko, 1997

    There will be a prize for progress!

    Don’t forget to tag your progress pictures on Instagram! Seattle MQG members who post their BOM progress on Instagram using the hashtags #cascadiacabinquilt or #smqgbom2020 by midnight, May 12th will be entered into a drawing for a nice prize, which David will mail to the winner. Not on Instagram? No problem. Simply email us at seattlemodernquiltguild@gmail.com by the same deadline with a photo of your BOM progress. The drawing will be held live during our May 13th Zoom membership meeting. Need not be present to win, but you do have to submit your progress to be included.

    Also continue to use the hashtags #seamqg  #seattlemqg  #showusyourmqg and #seattlemqgsewathome to share the wonderful quilts you’re creating.


  • July 19, 2023 10:05 PM | Anonymous member (Administrator)

    This is the third installment in the 2020 Seattle Modern Quilt Guild BOM project! Your guides on this journey are Susan Pray (IG: @sushi.farmer) and Kathy McGinnis (IG: @a_swede_life). 

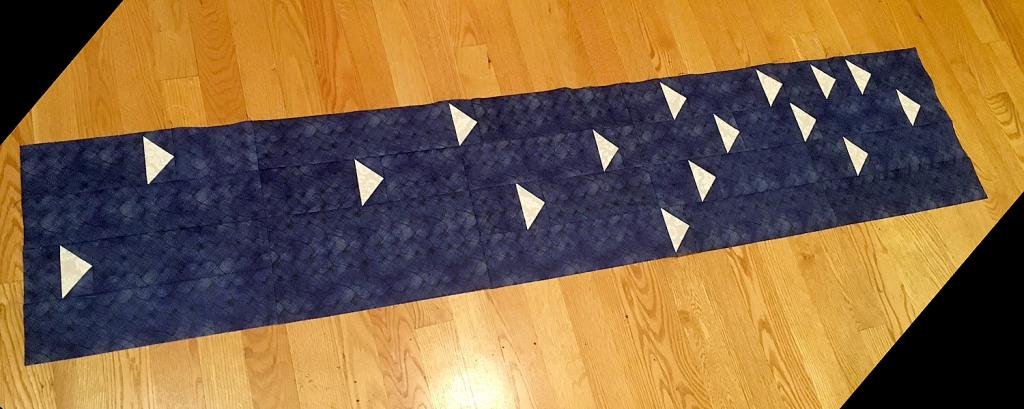
    This month our row-by-row-along will give directions to assemble the five 12” x 12” (finished size) square blocks that make up the second row of flying geese in sky fabric. Part I covers geese construction and Part II covers block assembly.  This month will seem absurdly simple compared to last month’s block construction and will take a lot less time to finish.

    You will need less than a FQ of fabric or an equal amount of scraps for your geese and about ¾ of a yard of sky fabric for this row.  Please see yardage requirements in February post for a full accounting of all yardage suggestions. Remember you can use scraps instead of yardage for this whole project.  If you wish to do that the block diagrams listed below will give you all cut sizes you need to make each block separately.

    Part I: Make Your Geese  

    A No Waste method (also called the 4 at a Time method) serves us quite well as there are a total of 16 geese, yes that was done on purpose.  If you’re familiar with this method of construction just skip down to fabric cutting directions and get your sew on my friends. If this is a new-to-you method then we have listed a few links to a video and a tutorial for your perusal although there are photos of each step included below.

    No waste flying geese tutorials:

    If you wish to create improv flying geese please feel free to do so!  This quilt pattern is all about the freedom to make it all yours. Below is a link to an improv tutorial.  Please note you’ll need to make all your geese the same size, 2” x 3.5” (unfinished), to fit into the blocks that make up the second row of this quilt.

    Improv flying geese tutorial:

    Total number of Geese needed (UNFINISHED size):

    • 2” x 3-½ ” – qty 16

    Cutting Directions:

    Cut 4 large squares from your geese fabric at 4-¼”  x 4-¼”  
    Cut 16 smaller squares from your sky fabric at 2-⅜” x 2-⅜”

    Please do not round up or down for these cuts, they need to be as exact as you can make them.  Yes they’re a pesky measurement but that’s what makes these magical “no waste” units.

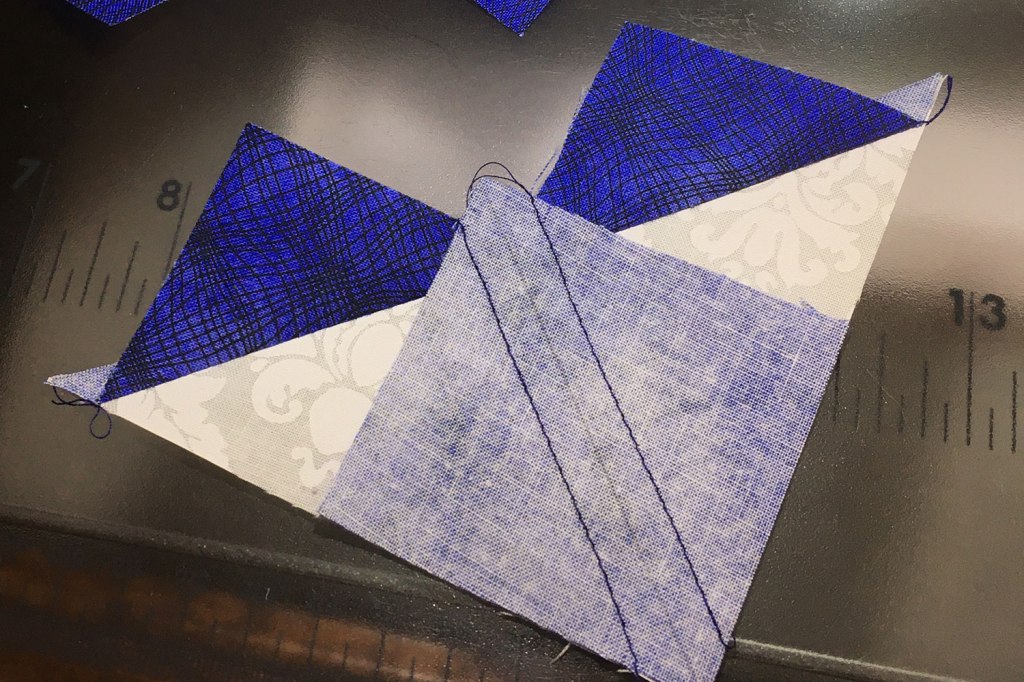
    Mark a line corner to corner on the back side of the smaller squares.  Lay two of the smaller squares right sides together on top of the larger square as shown here:

    Sew a scant ¼” seam on both sides of your corner to corner mark and cut on the mark.

    Press open and lay another smaller marked square right sides together like this:

    Again, sew a ¼” seam on both sides of your mark and cut on the mark.  Repeat with the fourth and final smaller square.  

    Press your 4 newly hatched geese open and admire them.  They should measure 2” x 3 ½” unfinished.

    Part II: Block Assembly

    Cutting directions for the background sky fabric:

    There are five unique blocks to assemble for the top row.  If you’re working from yardage cut the following WOF strips from your sky fabric and subcut as listed.  Please disregard if you’re working from scraps and cut fabrics for each block as you go along using the block diagrams at the end of this post.

    • Cut qty 6 WOF – 3 ½” strips from your sky fabric yardage. 

    Subcut the 3.5” strips into:

    • (7) 12.5”
    • (2) 11”
    • (2) 9.5”
    • (4) 8”
    • (3) 6.5”
    • (1) 6”
    • (1) 5.5”
    • (3) 5”
    • (5) 3.5”
    • (4) 2”

    Keep these 30 pieces in an orderly fashion as you’ll need to pull them by size to assemble the blocks.

    Flying geese diagrams:

    Using your geese and subcut strips, lay out and sew together your five 12.5” x 12.5” (unfinished size) blocks according to the following diagrams:

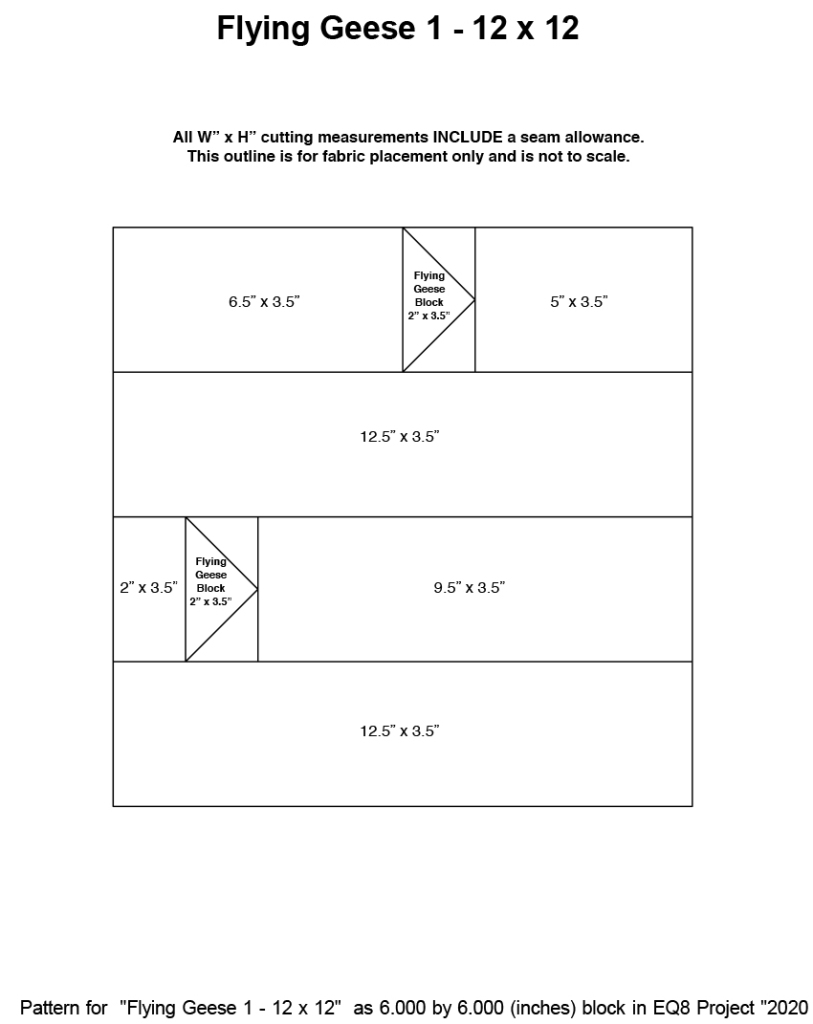
    Download PDF:  SMQG_2020BOM_FLYING_GEESE_BLOCK_1

    Pinterest Board:  https://www.pinterest.com/quiltguild/medallion-quilt-inspiration/

    Basic Seminole Patchwork by Cheryl Greider Bradkin, 1990

    Liberated Quiltmaking II by Gwen Marston, 2010

    Modern Blocks: 99 Quilt Blocks from Your Favorite Designers, complied by Suzanne Woods, 2011

    Modern Plus Sign Quilts by Cheryl Brickey and Paige Alexander, 2018

    Simply Seminole by Dorothy Hanisko, 1997

    Download PDF: SMQG_2020BOM_FLYING_GEESE_BLOCK_2

    Pinterest Board:  https://www.pinterest.com/quiltguild/medallion-quilt-inspiration/

    Basic Seminole Patchwork by Cheryl Greider Bradkin, 1990

    Liberated Quiltmaking II by Gwen Marston, 2010

    Modern Blocks: 99 Quilt Blocks from Your Favorite Designers, complied by Suzanne Woods, 2011

    Modern Plus Sign Quilts by Cheryl Brickey and Paige Alexander, 2018

    Simply Seminole by Dorothy Hanisko, 1997

    Download PDF: SMQGSMQG_2020BOM_FLYING_GEESE_BLOCK_3

    Pinterest Board:  https://www.pinterest.com/quiltguild/medallion-quilt-inspiration/

    Basic Seminole Patchwork by Cheryl Greider Bradkin, 1990

    Liberated Quiltmaking II by Gwen Marston, 2010

    Modern Blocks: 99 Quilt Blocks from Your Favorite Designers, complied by Suzanne Woods, 2011

    Modern Plus Sign Quilts by Cheryl Brickey and Paige Alexander, 2018

    Simply Seminole by Dorothy Hanisko, 1997

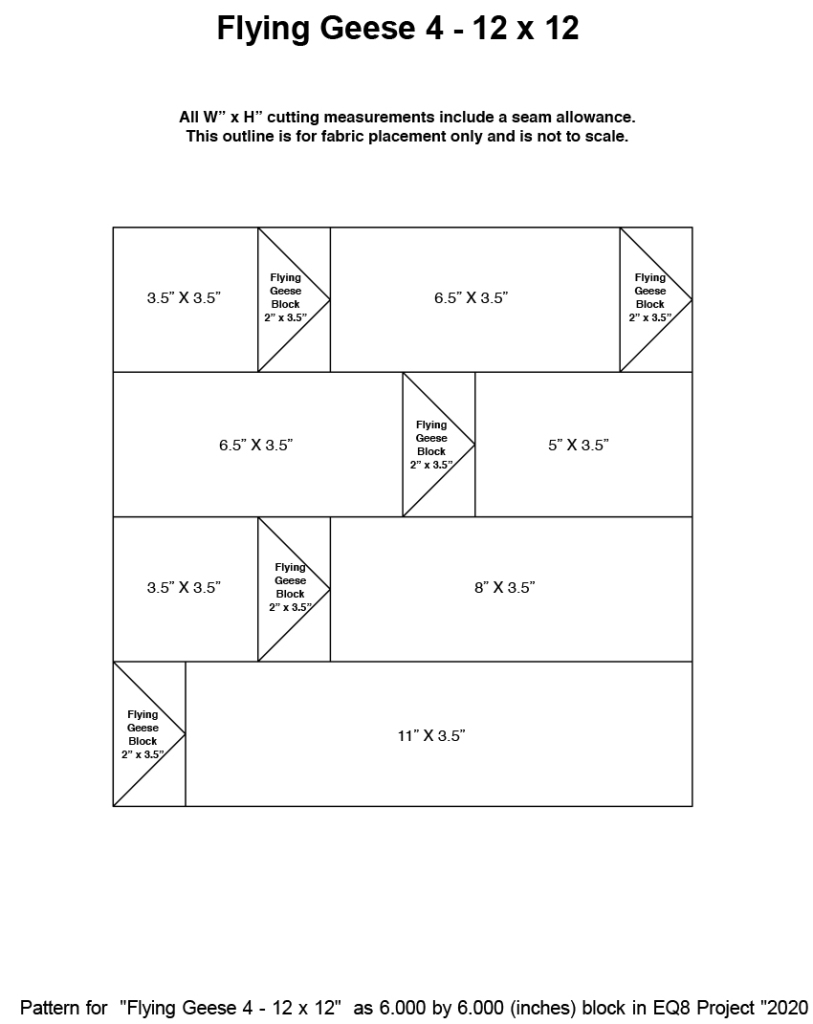
    Download PDF: SMQG_2020BOM_FLYING_GEESE_BLOCK_4

    Pinterest Board:  https://www.pinterest.com/quiltguild/medallion-quilt-inspiration/

    Basic Seminole Patchwork by Cheryl Greider Bradkin, 1990

    Liberated Quiltmaking II by Gwen Marston, 2010

    Modern Blocks: 99 Quilt Blocks from Your Favorite Designers, complied by Suzanne Woods, 2011

    Modern Plus Sign Quilts by Cheryl Brickey and Paige Alexander, 2018

    Simply Seminole by Dorothy Hanisko, 1997

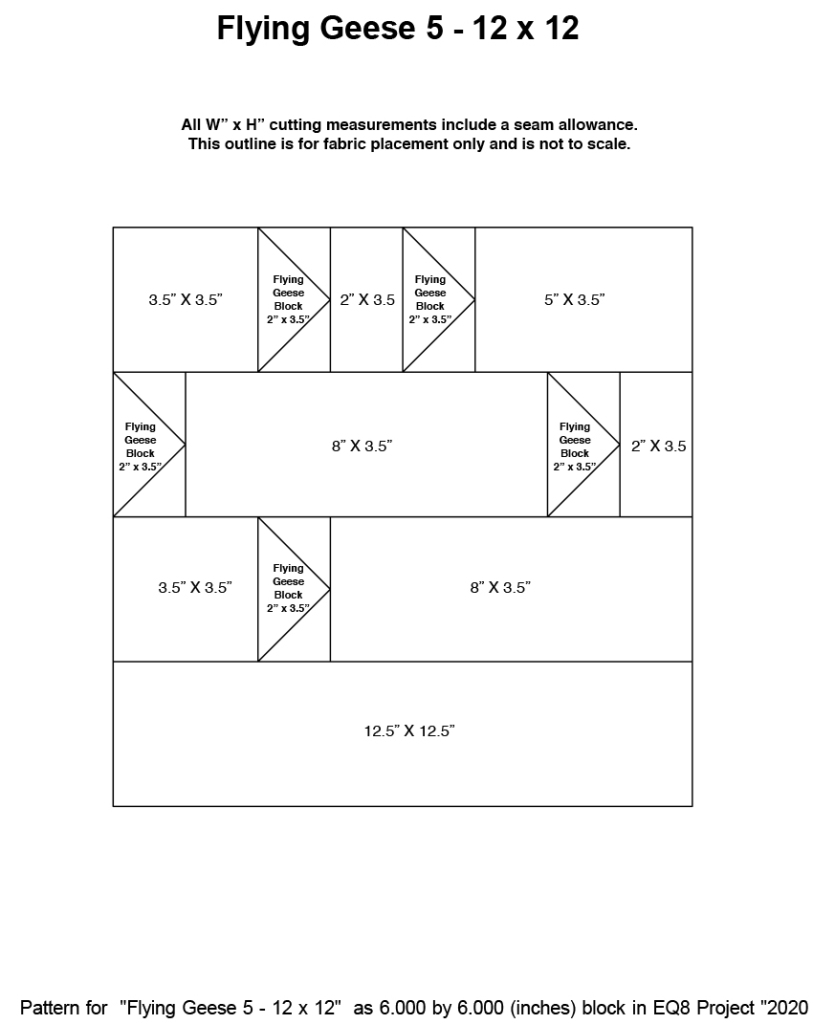
    Download PDF: SMQG_2020BOM_FLYING_GEESE_BLOCK_5

    Sew the finished blocks together in this configuration:

    Pinterest Board:  https://www.pinterest.com/quiltguild/medallion-quilt-inspiration/

    Basic Seminole Patchwork by Cheryl Greider Bradkin, 1990

    Liberated Quiltmaking II by Gwen Marston, 2010

    Modern Blocks: 99 Quilt Blocks from Your Favorite Designers, complied by Suzanne Woods, 2011

    Modern Plus Sign Quilts by Cheryl Brickey and Paige Alexander, 2018

    Simply Seminole by Dorothy Hanisko, 1997

    Be Social!

    Tag your progress pictures on Instagram!
    #cascadiacabinquilt  #smqgbom2020  #seamqg  #seattlemqg  #showusyourmqg and don’t forget to use #seattlemqgsewathome since we are all social distancing.


  • July 19, 2023 10:02 PM | Anonymous member (Administrator)

    SMQG_BOM_March_WonkyStars

    This month our row-by-row-along will show how to make wonky stars and give directions to assemble the five unique blocks that make up the top row of stars in sky fabric. Part I covers the stars and Part II covers block assembly.

    You will need about a third of a yard of star fabric or an equal amount of scraps and nearly a yard of sky fabric for this row.

    Please note you’ll want to set aside a minimum of 8″ square of star fabric for your moon at the end of the project and you’ll need additional sky fabric for future rows.  Please see yardage requirements in February post for a full accounting of all yardage suggestions.

    Part I: Make Your Wonky Stars  

    Wonky star basics  

    If you’re an experienced wonky star maker then carry on my friends, skip down to the section called “Total number of wonky stars needed”.  If not, we have listed a few tutorials below available on the internet. PLEASE NOTE: These tutorials provide construction techniques and end-product examples only, NOT directions for cutting the sizes we need. You should follow the “Wonky star cutting directions” section below to come up with the 3″, 4.5″, and 6″ finished block sizes. The closest tutorial is the first one listed, which makes a 6” finished star, but we need only one finished at that size; the rest are smaller. We’ve included photos of wonky star construction with this post as well, right after the cutting directions.

    A selection of wonky star 9-patch technique tutorials:

    A note about wonky star maths

    Because the stars are 9 patches, the finished size of the block is usually evenly divided by 3 to find the beginning size of the squares. Then of course add the ¼” seam allowance to find the cutting size.  There are a limited number of combinations that are “standard” sizes to cut, essentially on the quarter inch marks of our rulers that work out to be “standard” size finished blocks, usually whole or half-inch finishes. The three star sizes chosen in this pattern are all easy to cut.  All that said, you are welcome to go your own way here and improv up your stars using any math you wish! Don’t let us say you can’t! You do you.

    Total number of wonky stars needed (UNFINISHED sizes):

    • 3.5″ stars – qty 7
    • 5″ stars – qty 4
    • 6.5″ star – qty 1

    If you’re working from yardage cut the following width of fabric (WOF) strips from both the star and sky fabrics:

    • (2) – 1.5″
    • (2) – 2″
    • (1) – 2.5″

    These are conservative WOF cutting suggestions, you will need more of the smaller squares and less of the large squares.  Fortunately, you can cut the larger fabric down to size. This method will be employed more as we go along each month; it will conserve your fabric and create fewer scraps after the project is over. Please disregard if you’re working from scraps and cutting fabrics for each star as you go along.

    Wonky star cutting directions

    3.5″ – one star (cut 7 sets of these):

    • (8) – 1.5″ sq sky fabric
    • (9) – 1.5″ sq star fabric

    5″ – one star (cut 4 sets of these):

    • (8) – 2″ sq sky fabric
    • (9) – 2″ sq star fabric

    6.5″ – one star (cut 1 set of these):

    • (8) – 2.5″ sq sky fabric
    • (9) – 2.5″ sq star fabric

    Photos of Wonky Star Construction

    9-patch style layout:

    SMQG_BOM_March_01

    First seam sewn at any angle you choose, this is one sky square and one star square RST:

    SMQG_BOM_March_02

    First seam press open:

    SMQG_BOM_March_03

    Second seam sewn at any angle you choose:

    SMQG_BOM_March_04

    Second seam pressed open, a seam roller works well for this step:

    SMQG_BOM_March_05

    Trim extra star fabric to sky fabric square size:

    SMQG_BOM_March_06

    Cut away excess fabric from the back to reduce bulk:

    SMQG_BOM_March_07

    9-patch layout, you may wish to nest your seams when sewing this block together:

    SMQG_BOM_March_08

    Pressing these seams open is optional but helpful to get this block to lay flat:

    SMQG_BOM_March_09

    Finished stars pressed into submission with a wood clapper:

    SMQG_BOM_March_10

    Part II: Set the Stars Into Blocks

    Star block cutting directions and construction

    There are five unique blocks to assemble for the top row.  If you’re working from yardage cut the following WOF strips from your sky fabric and subcut as listed.  Please disregard if you’re working from scraps and cut fabrics for each block as you go along using the block diagrams at the end of this post.

    Cut strips of sky fabric WOF:

    • (2) at 3.5″

    Subcut into:

    • (1) 12.5″
    • (1) 10.5″
    • (1) 7.5″
    • (2) 6.5″
    • (2) 5.5″
    • (1) 3.5″
    • (2) 2.5″
    • (1) 2″
    • (2) 1.5″

    Set aside the remainder for future use.
    Cut strip of sky fabric WOF:

    • (1) 5″

    Subcut into:

    • (1) 15.5″
    • (1) 11″
    • (1) 5.5″
    • (1) 5″
    • (1) 1.5″

    Cut strip of sky fabric WOF:

    • (1) 5.5″

    Subcut into:

    • (1) 11.5″
    • (1) 8.5″
    • (1) 8″
    • (1) 4.5″

    Set aside the remainder for future use.
    Cut strip of sky fabric WOF:

    • (1) 6.5″

    Subcut into:

    • (1) 6.5″
    • (1) 5″
    • (1) 4.5″

    Cut remainder of 6.5″ strip long ways to 6″ wide.

    Subcut into:

    • (1) 4″
    • (1) 5″

    Set aside the remainder for future use.

    There are 2 remaining odd size pieces which don’t fall easily into sets.  Cut these two pieces separately:

    • (1) 2.5″ x 4.5″ – could be cut from one of the leftover strips
    • (1) 8.5″ x 11.5″

    Here are star block number one pieces ready to sew together:

    SMQG_BOM_March_11

    Star block diagrams:

    SMQG_2020BOM_STAR_BLOCK_1

    Download PDF:  SMQG_2020BOM_STAR_BLOCK_1

    SMQG_2020BOM_STAR_BLOCK_2

    Download PDF: SMQG_2020BOM_STAR_BLOCK_2

    SMQG_2020BOM_STAR_BLOCK_3

    Download PDF: SMQG_2020BOM_STAR_BLOCK_3

    SMQG_2020BOM_STAR_BLOCK_4

    Download PDF: SMQG_2020BOM_STAR_BLOCK_4

    SMQG_2020BOM_STAR_BLOCK_5

    Download PDF: SMQG_2020BOM_STAR_BLOCK_5


  • July 19, 2023 9:59 PM | Anonymous member (Administrator)

    SMQG_2020BOM_Quilt-Top-Photo

    Welcome to the 2020 Seattle Modern Quilt Guild BOM project! Your guides on this journey are Susan Pray (IG: @sushi.farmer) and Kathy McGinnis (IG: @a_swede_life). 

    We begin with a contemplation month. We’ll give you some information about the project so that you can prepare to “row along” with us over the coming year. Please join us!

    Project Name: 

    Cascadia Cabin in the Woods

    Project Difficulty: 

    This is moderately challenging patchwork with beginner-level improv added to the mix. Even if you’ve never done improv-style sewing there’s room for you here. There are no “Y” seams or curves or paper piecing. The biggest challenge will probably be staying organized, as the blocks are made up of non-standard size pieces. 

    Project Theme: 

    This is a Row by Row pattern with improv techniques within a pattern framework of non-standard block sizes.

    There are four types of blocks in this pattern that supply opportunities for simple improv sewing within the framework of a pattern: stars, trees, mountains, and houses. There are also flying geese blocks (4-at-a-time method) that could be done improv style if you prefer. We end with an applique moon, which you could choose to hand sew or apply with fusible interfacing. As we go along, we will provide links to different tutorials for improv stars, trees, and houses, along with how to finish the quilt.  

    There is room to make this project your own, whether through your choice of colors, prints, fabric type, or by showcasing your own improv style. Imagine this project as a winter quilt done in red and green with maybe some snow on the mountain tops. Or a fun Halloween quilt, complete with haunted house in place of the cabin and a witch flying over the moon. Or a monochromatic, minimalist composition. What’s your take on this design?  We’re hoping folks will use this pattern as a starting point, and make it their own.  

    Yardage Suggestions:

    FABRIC QUANTITY
    Sky 2.5 yards
    Stars & Moon .5 yard OR scraps
    Geese 1 fat quarter
    Mountain Peaks .75 yard
    Foothills & Forest Background 2.5 yards OR 10 fat quarters of scraps
    Trees Minimum of 4 fat quarters, the more the better if going scrappy
    Tree Trunks 1 fat quarter
    Improv Log Cabin Various scraps
    Backing 4.5 yards
    Binding .5 yard

    Be Social!

    Tag your progress pictures on Instagram!
    #cascadiacabinquilt  #smqgbom2020  #seamqg  #seattlemqg  #showusyourmqg

    Monthly Schedule

    The table below shows how the project is broken up for each month.
    The diagram shows the specific pieces we will be making each month.
    Relevant information will be shown again in the segments posted each month. 

    JANUARY Unveiling of design
    FEBRUARY Post online yardage requirements, theme, and a coloring page
    MARCH Make 12 wonky stars
    Cut sky fabric for all star blocks
    Assemble star blocks 1 through 5
    APRIL Make 16 flying geese
    Cut sky fabric for all geese blocks
    Assemble geese blocks 1 through 5
    MAY Make 25 improv trees (they go fast!)
    JUNE Cut forest fabric and sew tree blocks 1 through 4 together
    JULY Cut forest fabric and sew tree blocks 5 through 8 together
    AUGUST Make improv cabin and sew all the forest blocks and the cabin block together to complete the bottom part of the quilt
    SEPTEMBER Make mountain peaks blocks (sky fabric plus mountain peak fabric)
    OCTOBER Make foothill blocks (mountain peak fabrics plus forest fabrics)
    Assemble and complete mountains and foothills row
    NOVEMBER Sew all completed quilt top blocks together, add applique moon, finish quilt as desired
    DECEMBER Share finished quilts

    Coloring Page

    Print out this PDF and color it in to plan your design: SMQG_2020BOM_Quilt-Outline-Coloring-Page

    SMQG_2020BOM_Quilt-Outline-Coloring-Page

    Piece Sizes

    This PDF shows all the piece sizes within each major block. This will be handy when it comes to cutting and assembling the blocks: SMQG_2020BOM_Quilt-Outline-Piece-Sizes

    SMQG_2020BOM_Quilt-Outline-Piece-Sizes


    Full Color Design

    Here is a PDF of the full color quilt as designed in EQ8 software, showing the major block sizes: SMQG_2020BOM_Quilt-Full-Color-Block-Sizes

    SMQG_2020BOM_Quilt-Full-Color-Block-Sizes

    The Finished Quilt

    Finally, a photo of the finished quilt in the winter wonderland we experienced in early January:

    SMQG_2020BOM_Finished-Quilt-Photo

    Please note that a variety of scraps were used for the stars, forest, and trees.  This pattern would also work with a single fabric for the forest and foothills.  I also added a small black star in the upper right corner because I couldn’t even follow my own pattern when I made this quilt. The sky was asking for a small black hole star right there and I couldn’t say no.  That’s what I’m hoping you’ll do, take this pattern as a suggestion and make it a reflection of your ideas. — Susan Pray

    March Instructions

    We will aim to post the next instructions on the 1st of the month. Stay tuned!


Copyright 2024 Seattle Modern Quilt Guild

"Seattle Modern Quilt Guild" is a 501(c)3 non-profit organization.

Powered by Wild Apricot Membership Software