• Home
  • 2024 Block of the Month (BOM)


Seattle MQG 2024 Block of the Month (BOM)

Hosted by Louise Wackerman (@imfeelincrafty)


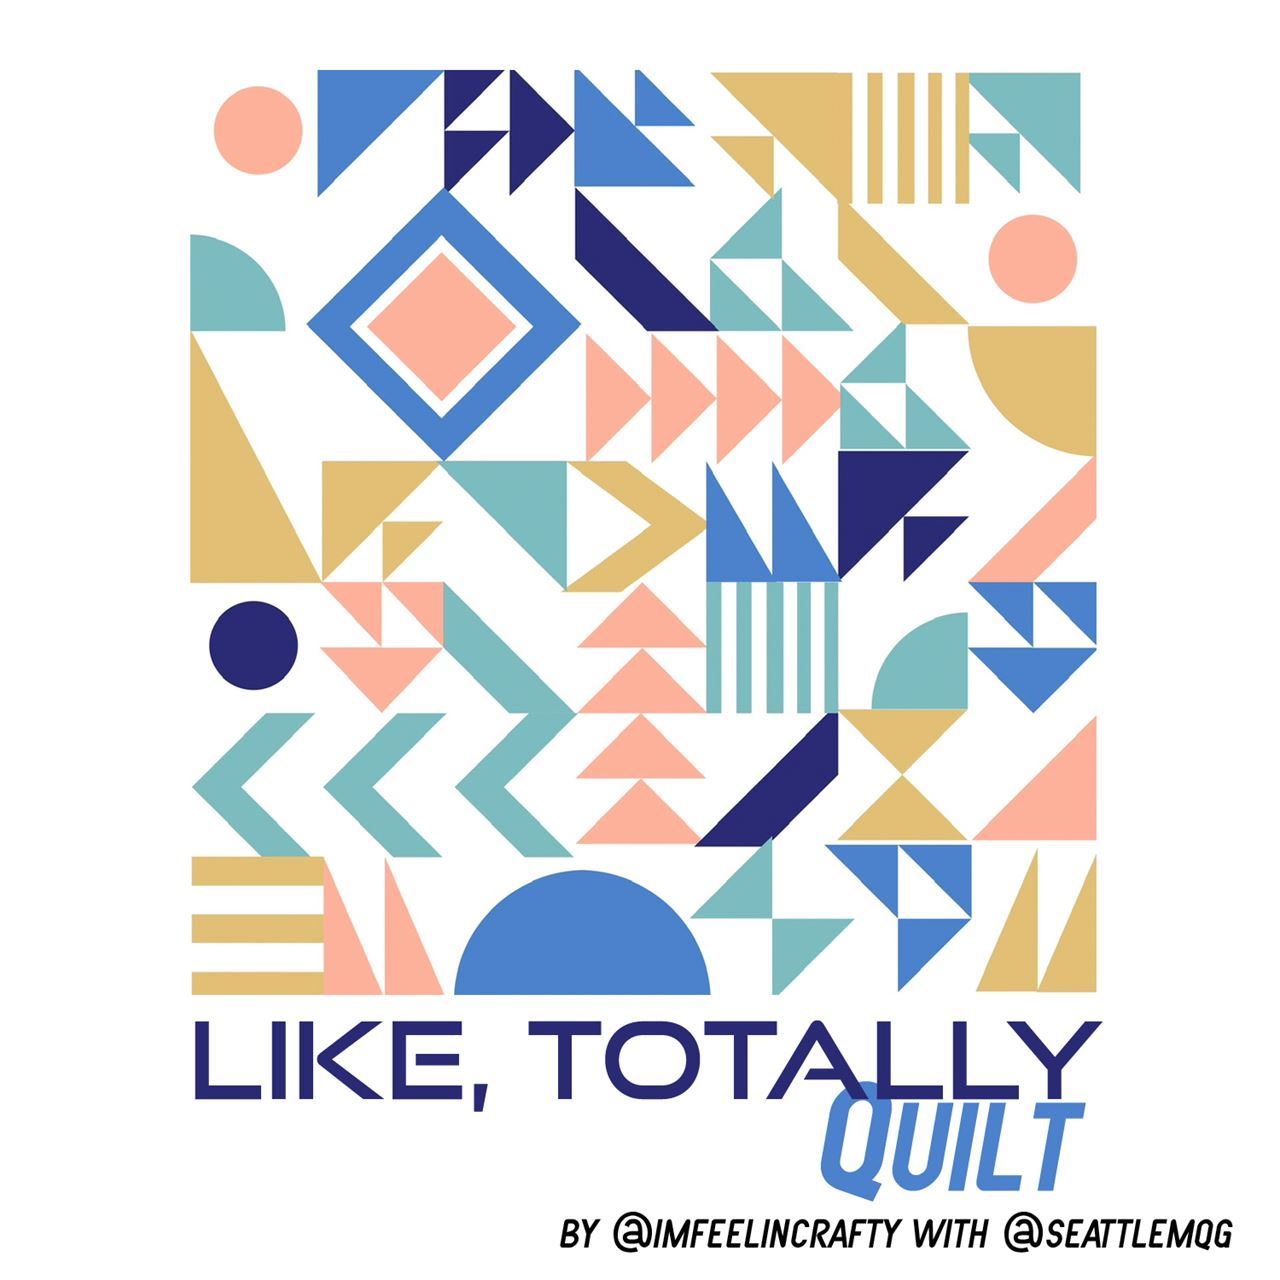
I’m so excited to be sharing this quilt with you and having you sew along with me to make it. To me it has a little ‘80s flair to it, so I named it the ‘Like, Totally’ quilt! Do you feel the ‘80s? 

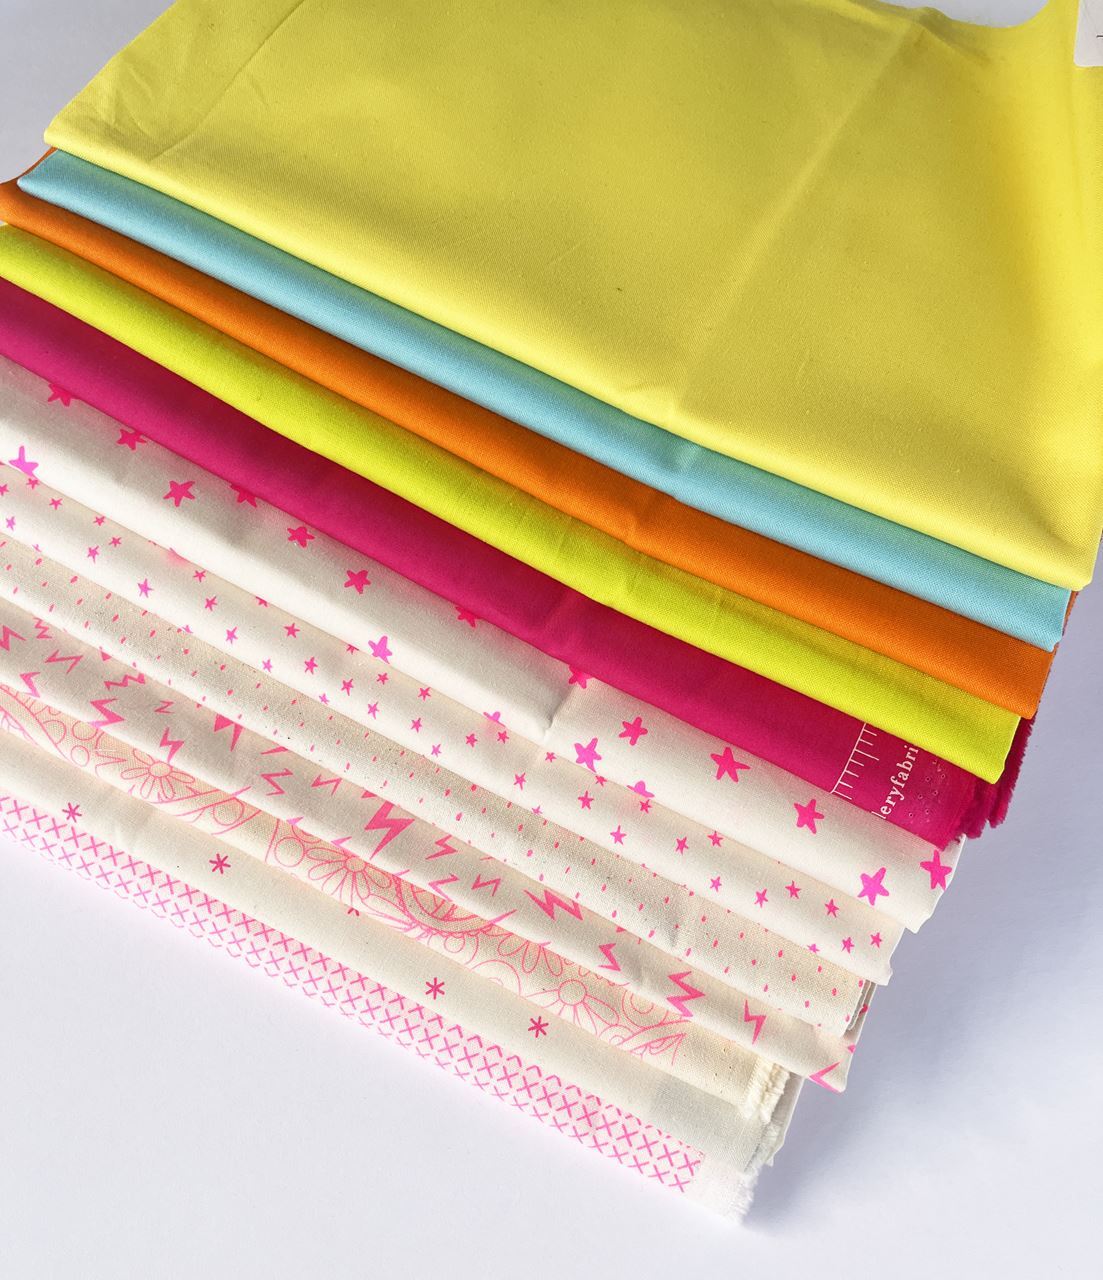
First step is to pick your fabric. You’ll need a background fabric and 5 accent colors. I made a swatch sheet for you to use to keep track of your fabrics with the design colors. You can download it here. In keeping with the ‘80s theme, I decided to go with a neon palette. I am cutting into my pink neon print stash for my background fabric and neon pink, green, blue, orange and yellow for the other fabrics. 


Fabric Quantities: 

  • Background - 3 ½ yards
  • Fabric 1- 1 yard
  • Fabric 2- ¾ yards
  • Fabric 3- ¼ yard
  • Fabric 4- 1 yard
  • Fabric 5- ¾ yards
  • Binding- ½ yard

I did round up to the nearest ¼ yard, so we may have a some bits left over to go towards the back! 


This could also be a fun scrap quilt! And I have a sneaky feeling I might see a red and white version…. (You know who you are!) 

For each of the blocks, I’ll either be sharing a quick tutorial or I’ll be sharing links to tutorials to make the blocks. 

The overall quilt will be 56” square made up of 8” finished blocks (8.5” unfinished block). 

I’m an improv quilter, but for this one I’m not making the blocks improv, but I do think it would be fun as an improv quilt, too! 

The swatch sheet has the hashtags for this year’s BOM. Be sure to post as you go and include the hashtags so we can all encourage each other throughout the year. 

#liketotallyquilt

#seamqgbom2024

#seamqg

This is going to be fun!!

  • July 01, 2024 10:04 PM | Anonymous member (Administrator)

    This month's block is a mouthful! Half Rectangle Triangle blocks!  They are pretty easy blocks again. The main trick is to angle the background fabric in the right direction.

    We’re going to make (3) different blocks using half rectangle triangles (HRT). These will be two double blocks, one oriented to the left and two oriented to the right, and one large one.  

    This month you will need your background fabric and Colors 1, 2, and 4

    Cutting for the HRTs: 

    (1)  9” x 5” rectangle of Color 1.  

    (1)  9” x 5” rectangle of Color 2. 

    (1)  9” x 5” rectangle of Color 4.  

    (3)  9” x 5” rectangles of the background fabric

    (1)  17 1/2” x 9 1/2” rectangle of Color 4.  

    (1)  17 1/2” x 9 1/2” rectangle of the background fabric


    You can download a PDF of the directions here.


    Step 1: Starting with our double HRT block in Color 4. 

    Stack your background and Color 4 rectangles. Orient the fabrics with the Color 4 fabric straight and your background fabric angled as shown below, with right sides together. Mark the line from corner to corner. 


    Step 2: Sew a ¼” seam on each side of your line. (This is a good spot to chain stitch again with the other rectangle blocks.)

    Step 3: Cut along the line you drew in Step 1.

    Step 4: Open the rectangles and iron the seam allowances open. Do this for both halves.

    Step 5: Trim the blocks to 4 ½” x 8 ½” rectangles. 

    Step 6:  Sew together the (2) HRTs with both HRTs oriented in the same direction as shown below. 

    Step 7: Now for our other two double HRT blocks in Colors 1 and 2. 

    Repeat steps 1-6 with your Colors 1 and 2 rectangles and the background fabric. For these blocks, orient your background fabric in the opposite direction of your previous block as shown below, right sides together. 

    Step 8: Now you have three 8 ½” blocks! Two oriented towards the right and one oriented towards the left! 

    Step 9: On to the large block! 

    Orient the rectangles as you did in Step 7 and repeat Step 1. 

    Step 10: For the oversized block you can choose to sew on one or both sides of your line. 

    You only need one large HRT. You can sew on both sides for two HRTs and use one for the front and save one for the back of the quilt! Or, you can save your fabric and possibly use it in a future block. 

    Then continue to repeat Steps 3 and 4 for this block. 

    Step 11: Lastly, trim your oversized block to 8 ½” x 16 ½”  

    And with that, we’re another 4 quilt blocks closer to a quilt top!! 


  • May 31, 2024 11:46 PM | Anonymous member (Administrator)

    This month we will be making quarter circles! These quarter circle blocks are one of my favorite blocks to make. You’ll see them in a LOT of my quilts! Hope you enjoy it as well. 

    This month you will need your background fabric and Colors 2, 4 and 5. You will also want to download the PDF instructions and Templates for these blocks. 


    Cutting: 

    (5) 9” x 9” squares of Background Fabric

    (2) 9” x 9” squares of Color 2 Fabric

    (1) 9” x 9” squares of Color 4 Fabric

    (2) 9” x 9” squares of Color 5 Fabric

    Cut out the two sets of templates and tape them together

    Step 1: We’re going to start with Templates A and B for the smaller quarter circles in Color 5. Stack your Color 5 fabrics and position the Template B in the corner. Cut along the dashed line, the ¼ seam allowance line. 

    Step 2: Stack your Background fabrics and position Template A in the corner. Cut along the dashed line, the ¼ seam allowance line. 

    When cutting, be aware if you have directional fabric, that the fabric will be in the correct direction. This is most important with the two Color 2 blocks, using Template C, as they will be mirror images of each other. 


    Step 3: Position the background piece on top of the Color fabric. Sew the pieces together along the curved edge. Sew slowly and ease the background fabric along the curve of the Color fabric. Avoid stretching the fabrics. Both edges will align. 

    I don’t pin, but you can. Starting at the center of both curves, pin and work your way to the edges. Then sew along the curves. 

    Step 4: Iron the seam allowances toward the quarter circle.  

    Step 5: Trim the block to 8 ½” square. When trimming, position the quarter circle to be 2 ¾” away from the corners. (The 2 ¾” doesn’t need to be exact, as the circles do not align with other blocks.)

    Step 6: Repeat for the other block. You will have two of these blocks, both in Color 5.

    Step 7: Repeat steps 1 thru 6 with Templates C and D and your Background fabric and Colors 2 and 4. Trim the block to 8 ½” square. For these blocks, position the quarter circle to be ¾” away from the corners.

    Step 8: You will have three of these blocks, one in Color 4 and two in Color 2.

    Step 9: We’re not going to let our scraps go to waste! For these, you don’t want to align the edges, but offset them about a ½”. Or you can pin starting from the center. Then sew them together following Steps 3 and 4. 

    Step 10: You will end up with 5 more blocks. I didn’t trim mine. You can square them or you can leave as they are until later! Set aside and we’ll use these later! 

    Hopefully, you enjoyed these as much as I do! 


  • May 05, 2024 12:17 PM | Anonymous member (Administrator)

    Sorry for the delay this month! I made it an easy one since I'm getting a late start this month! 

    This month we will be making stripes! Should be an easy month! 


    This month you will need your background fabric and Colors 4 and 5

    Cutting: 

    Background rectangles: 

    (6) 1 ⅝” x 9” rectangles of Background Fabric

    (6) 2” x 9” rectangles of Background Fabric

    (6) 1 ⅝” x 9” rectangles of Color 4

    (3) 1 ⅝” x 9” rectangles of Color 5

    You can download a PDF of the instructions here.


    Step 1: Stack your rectangles right sides together. Stack a wide background rectangle with a color stripe, two times. Stack a skinny background rectangle with a color stripe. Sew down the long side of the rectangles with a ¼” seam allowance. Iron seam allowances open. 

    Step 2: Add to the stripe sets from Step 1. Sew the wide/skinny stripe set to the skinny/skinny stripe set. Sew the wide/skinny stripe set to the other skinny background stripe. Sew using a ¼” seam allowance and iron seams open.

    Step 3: Sew the stripe sets from Step 2 together using a ¼” seam allowance. Iron seams open.

    Step 4: Trim the blocks to an 8 ½” square block. 

    Step 5: Repeat for two more blocks. 

    And with that, we’re done! Another month of blocks complete! 


  • April 01, 2024 10:41 PM | Anonymous member (Administrator)

    April Showers bring May flowers and Half Square Triangles!! Hopefully it will be another quick month for everyone with their blocks. 


    We’re going to make (3) different block types using half square triangles (HST), background squares and our three leftover flying geese from last month. 


    Block 1: 


    Block 2: 


    And Block 3: 


    This month you will need your background fabric and Colors 1, 2, 3, and 5


    Cutting: 

    Background squares: 

    (5) 4 ½” squares of the background fabric


    For the HSTs: 

    (1)  5” square of Color 1.  

    (3)  5” square of Color 2. 

    (1)  5” square of Color 3.  

    (4)  5” square of Color 5.  

    (9)  5” Squares of the background fabric


    You download the instructions here. 


    Step 1: Stack your 5” squares, (1) Color piece and (1) Background piece, right sides together.  

    Step 2: Use a pen or chalk pencil to draw a line from corner to corner as a guide for your stitching. Then sew a ¼” seam on each side of your line. (This is a good spot to chain stitch again with the two squares)

    Step 3: Cut along the line you drew in the previous step.

    Step 4: Open the triangles and iron with seam allowances open. Do this for both halves.

    Step 5: Trim all the blocks to 4 ½” x 4 ½” squares. 


    Step 6: Now we will start putting the blocks together starting with Block 1. There are (3) Block 1s to make using Colors 2 and 5, (1) in Color 2 and (2) in Color 5. 


    Sew together (2) HSTs with both HSTs oriented in the same direction as shown below. 

    Step 7: Sew together (1) HST and (1) of the background squares oriented as shown below. 

    Step 8: Sew the two pieces from Steps 6 and 7 together. Repeat for the three blocks. 

    Step 9: Now we will move to piecing Block 2. There is only (1) Block 2 in Color 5. 


    Sew together (1) HST and (1) of the background squares oriented as shown below. Do this twice. 


    Step 10: Sew the two pieces from Step 9 together with the triangle points touching as shown below. 

    Step 11: Now we will move to piecing Block 3. This Block finishes the unfinished flying geese blocks from last month. There are three of these blocks in Colors 1, 2 and 3. 


    Sew together (2) HSTs with both HSTs oriented in the same direction as shown below. Repeat for each of the (3) colors. 


    Step 12: Sew the piece from Step 11 and the flying geese block from last month together as shown below. Repeat for each of the (3) colors. 


    And with that, we’re done! Another month of blocks complete! 


  • March 02, 2024 5:22 PM | Anonymous member (Administrator)

    You can It’s March! Can you believe it? Obviously, I wasn’t ready for March since I’m a day late posting this months blocks… This month we are making Flying Geese Blocks!

    We’re going to make the blocks (or part of the blocks shown above). You will need your background fabric and colors 1, 2, 3 and 4. 

    Cutting: 

    For the (2) four at a time flying geese cut: 

    (2) 9 ½” squares out of the Color 1 fabric. This will be the ‘triangle fabric’

    (8) 5 ½” Squares of the background fabric


    For the (5) one at a time flying geese cut: 

    (1) 5” x 9” rectangle of Color 1.  This will be the ‘triangle fabric’

    (1)  5” x 9” rectangle of Color 2.  This will be the ‘triangle fabric’

    (1)  5” x 9” rectangle of Color 3.  This will be the ‘triangle fabric’

    (2)  5” x 9” rectangle of Color 4.  This will be the ‘triangle fabric’

    (10) 5” Squares of the background fabric


    You can download a PDF of the instructions here. 


    The first block we are going to make is the double flying geese block. It looks like a quadruple flying geese block, but we’re going to split it into (2) double flying geese. These are going to be made using the background fabric and Color 1 fabric using the 4 blocks a time technique..


    This month, I switched gears to make this tutorial in diagrams rather than photos. Hopefully, you like the diagrams and they make sense! 

    Step 1- Layout your large squares with 2 of the smaller squares situated on top as shown below. You will want to clip the overlap between of the smaller squares. You can clip these with scissors or lay it out on your cutting mat and cut there. 

    Step 2: Use a pen or chalk pencil to draw a line from corner to corner as a guide for your stitching. Then sew a ¼” seam on each side of your line. (This is a good spot to chain stitch again with the two squares)

    Step 3: Cut along the line you drew in the previous step.

    Step 4: Open the triangles and iron with seam allowances open. Do this for both halves.

    Step 5: Add another 5 ½” block in the corner, draw your guide line from corner to corner. Then sew a ¼” seam allowance on each side of the line. (Another opportunity to chain stitch with the other half of you finished in Step 3.)


    Step 6: Cut along the drawn line.

    Step 7: You now have (2) flying geese blocks, (4) with the other half. Iron you seam allowances open.

    Step 8: Trim all the blocks to 4 ½” x 8 ½” blocks with ¼” at the point of the triangle.

    Step 9: Repeat all the steps for the other half if you haven’t already done it. Now you have the 8 flying geese blocks. Sew them into pairs. You’ll end up with (4) 8 ½” blocks. You are done with these for now. We’ll sew them together later in the year.

    Next up is the 1 at a time flying geese blocks. We are going to do this process 5 times, or get yourself set up do it with chain stitching since you already cut everything (my preference). 


    We’re going to make the block on the right and the flying geese blocks for the blocks on the right. 

    Step 1: Layout your large rectangle with 1 of the smaller squares situated on top as shown below. You are going to mark the diagonal line from corner to corner to help you stay straight. Then sew right over that line. (insert chain stitching recommendation here!)

    Step 2: Cut the corners off, ¼” off of the sewn line. Save those corners! 

    Step 3: Iron with seam allowances open. 

    Step 4: Basically, you are going to repeat steps 1-3 on the other corner with another 5” square of the background fabric. You are going to mark the diagonal line from corner to corner to help you stay straight. Then sew right over that line.

    Step 5: Cut the corners off, ¼” off of the sewn line. Save those corners! 

    Step 6: Iron with seam allowances open. 

    Step 7: Trim all the blocks to 4 ½” x 8 ½” blocks with ¼” at the point of the triangle.

    Step 8: You are done with the blocks in Colors 1, 2, and 3. Sew your (2) Color 4 blocks together, point to point. 

    That’s it for this month! Yay! 


  • February 14, 2024 5:00 PM | Anonymous member (Administrator)

    I'm so excited that you are, like, going to sew along with me! Let's get started! 

    After you pick your fabric, we’re going to work on these blocks this month- 


    You will make 2 blocks in Color 3, 1 block in Colors 1, 4 and 5 for a total of 5 blocks. 

    Here we go! 

    Cutting: 

    (5) 9” squares from your background fabric.

    (1) 3 ¼” x 12 ½” rectangle from Color 1

    (2) 3 ¼” x 12 ½” rectangle from Color 3

    (1) 3 ¼” x 12 ½” rectangle from Color 4

    (1) 3 ¼” x 12 ½” rectangle from Color 5


    You can download a PDF of the instructions here. 

    Step 1 - Cut the 9” square into two triangles. Cut line is ¼” offset from corner to corner of the block for a 1/4" seam allowance.

    Step 2- Sew the color rectangle to the larger triangle (the one with the 1/4 seam allowance). I suggest chain piecing. 

    Step 3- Press the seam allowance. I prefer to press my seams open for this block. 

    Step 4- Align the corners of the two triangles. Sew the smaller triangle to the other side of the rectangle. Chain piecing again! 

    Step 5- Press the seam allowance.

    Step 6- Trim the block to 8 ½”.  

    Step 7- Repeat each step for the 5 blocks if you haven’t chained pieced as you go. 

    And then you'll have your first 5 blocks! I think it will take you longer to pick your fabric than make these 5 blocks, especially if you chain piece as you go! 


Copyright 2024 Seattle Modern Quilt Guild

"Seattle Modern Quilt Guild" is a 501(c)3 non-profit organization.

Powered by Wild Apricot Membership Software