This month our row-by-row-along will show how to make wonky stars and give directions to assemble the five unique blocks that make up the top row of stars in sky fabric. Part I covers the stars and Part II covers block assembly.
You will need about a third of a yard of star fabric or an equal amount of scraps and nearly a yard of sky fabric for this row.
Please note you’ll want to set aside a minimum of 8″ square of star fabric for your moon at the end of the project and you’ll need additional sky fabric for future rows. Please see yardage requirements in February post for a full accounting of all yardage suggestions.
Part I: Make Your Wonky Stars
Wonky star basics
If you’re an experienced wonky star maker then carry on my friends, skip down to the section called “Total number of wonky stars needed”. If not, we have listed a few tutorials below available on the internet. PLEASE NOTE: These tutorials provide construction techniques and end-product examples only, NOT directions for cutting the sizes we need. You should follow the “Wonky star cutting directions” section below to come up with the 3″, 4.5″, and 6″ finished block sizes. The closest tutorial is the first one listed, which makes a 6” finished star, but we need only one finished at that size; the rest are smaller. We’ve included photos of wonky star construction with this post as well, right after the cutting directions.
A selection of wonky star 9-patch technique tutorials:
A note about wonky star maths
Because the stars are 9 patches, the finished size of the block is usually evenly divided by 3 to find the beginning size of the squares. Then of course add the ¼” seam allowance to find the cutting size. There are a limited number of combinations that are “standard” sizes to cut, essentially on the quarter inch marks of our rulers that work out to be “standard” size finished blocks, usually whole or half-inch finishes. The three star sizes chosen in this pattern are all easy to cut. All that said, you are welcome to go your own way here and improv up your stars using any math you wish! Don’t let us say you can’t! You do you.
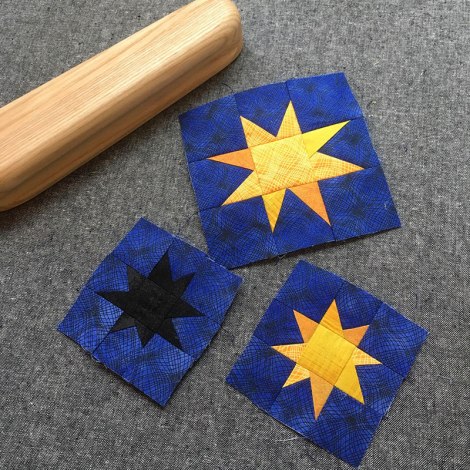
Total number of wonky stars needed (UNFINISHED sizes):
- 3.5″ stars – qty 7
- 5″ stars – qty 4
- 6.5″ star – qty 1
If you’re working from yardage cut the following width of fabric (WOF) strips from both the star and sky fabrics:
- (2) – 1.5″
- (2) – 2″
- (1) – 2.5″
These are conservative WOF cutting suggestions, you will need more of the smaller squares and less of the large squares. Fortunately, you can cut the larger fabric down to size. This method will be employed more as we go along each month; it will conserve your fabric and create fewer scraps after the project is over. Please disregard if you’re working from scraps and cutting fabrics for each star as you go along.
Wonky star cutting directions
3.5″ – one star (cut 7 sets of these):
- (8) – 1.5″ sq sky fabric
- (9) – 1.5″ sq star fabric
5″ – one star (cut 4 sets of these):
- (8) – 2″ sq sky fabric
- (9) – 2″ sq star fabric
6.5″ – one star (cut 1 set of these):
- (8) – 2.5″ sq sky fabric
- (9) – 2.5″ sq star fabric
Photos of Wonky Star Construction
9-patch style layout:

First seam sewn at any angle you choose, this is one sky square and one star square RST:
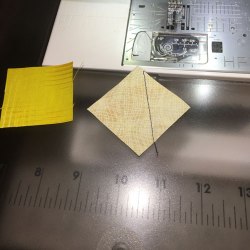
First seam press open:

Second seam sewn at any angle you choose:

Second seam pressed open, a seam roller works well for this step:

Trim extra star fabric to sky fabric square size:
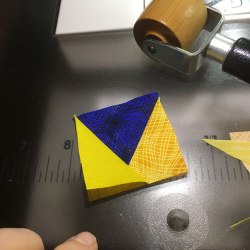
Cut away excess fabric from the back to reduce bulk:

9-patch layout, you may wish to nest your seams when sewing this block together:

Pressing these seams open is optional but helpful to get this block to lay flat:

Finished stars pressed into submission with a wood clapper:

Part II: Set the Stars Into Blocks
Star block cutting directions and construction
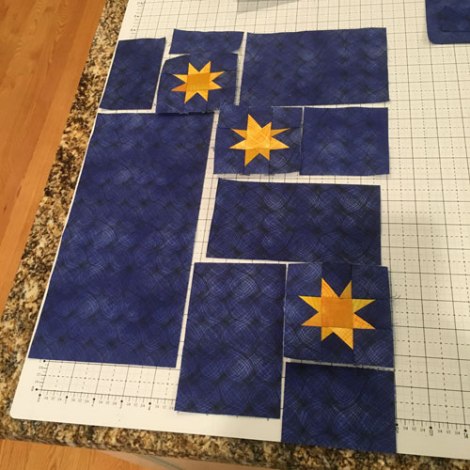
There are five unique blocks to assemble for the top row. If you’re working from yardage cut the following WOF strips from your sky fabric and subcut as listed. Please disregard if you’re working from scraps and cut fabrics for each block as you go along using the block diagrams at the end of this post.
Cut strips of sky fabric WOF:
Subcut into:
- (1) 12.5″
- (1) 10.5″
- (1) 7.5″
- (2) 6.5″
- (2) 5.5″
- (1) 3.5″
- (2) 2.5″
- (1) 2″
- (2) 1.5″
Set aside the remainder for future use.
Cut strip of sky fabric WOF:
Subcut into:
- (1) 15.5″
- (1) 11″
- (1) 5.5″
- (1) 5″
- (1) 1.5″
Cut strip of sky fabric WOF:
Subcut into:
- (1) 11.5″
- (1) 8.5″
- (1) 8″
- (1) 4.5″
Set aside the remainder for future use.
Cut strip of sky fabric WOF:
Subcut into:
Cut remainder of 6.5″ strip long ways to 6″ wide.
Subcut into:
Set aside the remainder for future use.
There are 2 remaining odd size pieces which don’t fall easily into sets. Cut these two pieces separately:
- (1) 2.5″ x 4.5″ – could be cut from one of the leftover strips
- (1) 8.5″ x 11.5″
Here are star block number one pieces ready to sew together:
Star block diagrams:
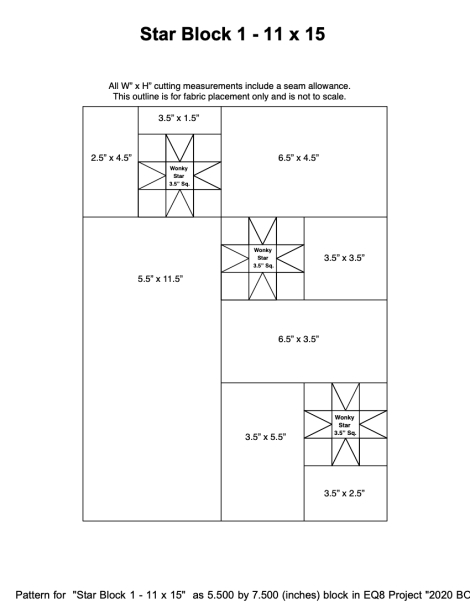
Download PDF: SMQG_2020BOM_STAR_BLOCK_1
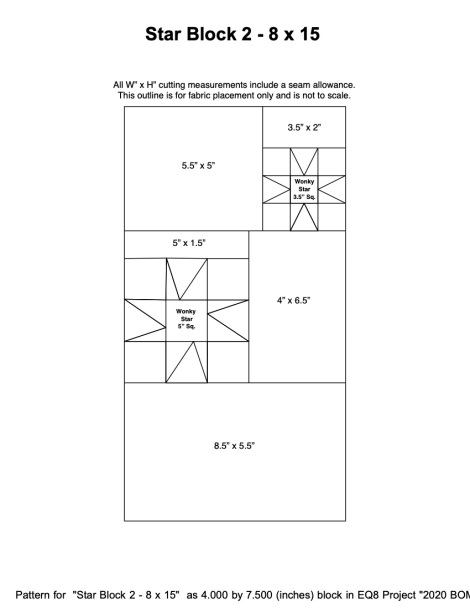
Download PDF: SMQG_2020BOM_STAR_BLOCK_2

Download PDF: SMQG_2020BOM_STAR_BLOCK_3
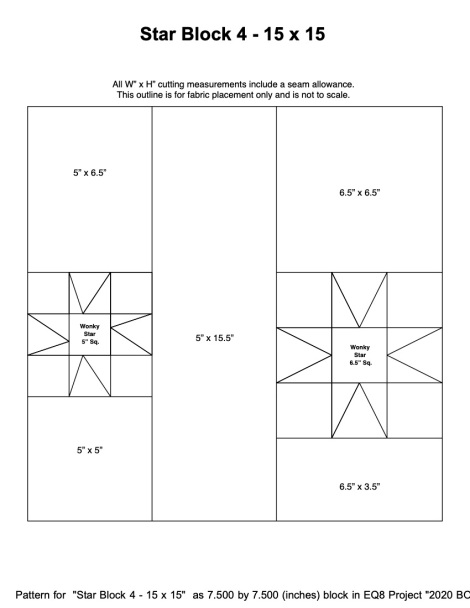
Download PDF: SMQG_2020BOM_STAR_BLOCK_4

Download PDF: SMQG_2020BOM_STAR_BLOCK_5
